When was the last time you found yourself watching a video on mute, whether it was because you were at the office, in a public space, or simply because you didn't want the sound on?
Likely not that long ago.
And guess what? You’re not alone. It’s estimated that a striking 92% of individuals are viewing videos without sound on the internet.
As people consume an increasing amount of video in their daily lives for both personal and professional purposes, adding subtitles to your video marketing strategy is a must.
Why?
- It makes your content more widely viewable and accessible to diverse audiences,
- It also boosts your SEO, ROI and video metrics like play rate and engagement.
In this article, you will learn the difference between subtitles, captions and closed captions, why adding subtitles to your videos is essential and how you can add them to your videos.
Ready? Let’s dive in.
The difference between subtitles, captions, and closed captions
It’s a common misconception that the terms captions, closed captions, and subtitles can be used interchangeably, because there is in fact a difference in definitions.
However, they’re quite different.
- Subtitles refers to the transcribed or translated text of any spoken speech in a video. This includes monologues, dialogues, and narration.
- Captions also refer to transcribed speech, as well as text descriptions of any audio elements or music that are in the video. For example, text descriptions notify the viewer that there is [loud background chatter] in a crowded bar scene or [suspenseful music] during a tense moment.
- Closed captioning is designed for deaf or hard-of-hearing audiences to be able to understand dialogue as well as capture the nuanced contexts of what’s happening with audio cues in the video. They are “closed” because the viewer can turn these captions on and off according to their preference. “Open” captions are integrated into the original video file and always remain on-screen, so they cannot be removed or turned off.
Why adding subtitles to videos is so important
Adding subtitles to professional and marketing videos has real benefits for businesses.
And we’ve got numbers to prove that.
In the case of corporate interview videos, you can make long winding sentences more comprehensible and information retention easier by segmenting the interviewee’s speech into short readable phrases in the captions.
Successfully capturing potential customers’ attention out of the hundreds and thousands of competitors online is crucial for businesses. Keeping that attention for as long as possible – even more critical, if only by seconds.
The good news? Studies show that users are 80% more likely to watch a video to the end when closed captioning is available.

PlayPlay Pro Tip
You're convinced of the advantages of video and including subtitles, but you're not sure if you could create a video by yourself?
One thing ahead: You can!
If you need more information on choosing your video equpiment for beginners, intermediates and experts, we've got something for you. However, you can also create a video out of your photos or learn how to crop a video!
How to add subtitles to videos: a step-by-step guide
Whether you choose to use an external automation service or to go the DIY route, you now know that adding subtitles to your marketing and corporate videos is a key step to implement in your video creation process going forward.
Here’s a curated list of popular video platforms and a step-by-step guide on how to use each of their unique tools to add subtitles and captions.
PlayPlay
PlayPlay is an intuitive video creation platform, designed to help marketing, communications, and social media teams make professional videos in minutes. Whether it's to create online content for stories, interviews, or ads, PlayPlay is a powerful tool that makes high-quality video creation faster, easier, and more accessible than ever.
Users have access to tons of easy-to-use templates and premium features like video transitions, stock music and an image library integrated directly into an intuitive interface. PlayPlay’s all-in-one solution eliminates the need for advanced video editing software or hiring expensive production agencies.
Wondering how to make professional videos and reach a wider audience? Look no further! With PlayPlay's, you can effortlessly add subtitles to videos and create captivating content.
How to add subtitles to your video on PlayPlay:
Option 1: Using Automatic Subtitles (A.I.)
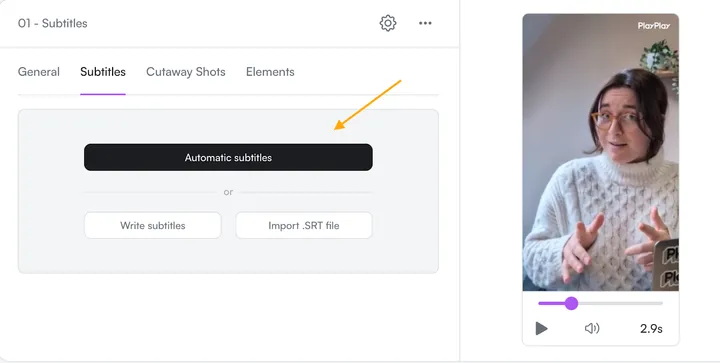
On the PlayPlay editor, pick the video you want to add subtitles to, then select “subtitles”. Here, you’ll be able to simply click the “automatic subtitles” button and watch the magic happen.
You will then be able to freely edit your subtitles to make sure they match the images.
Option 2: Write your own subtitles
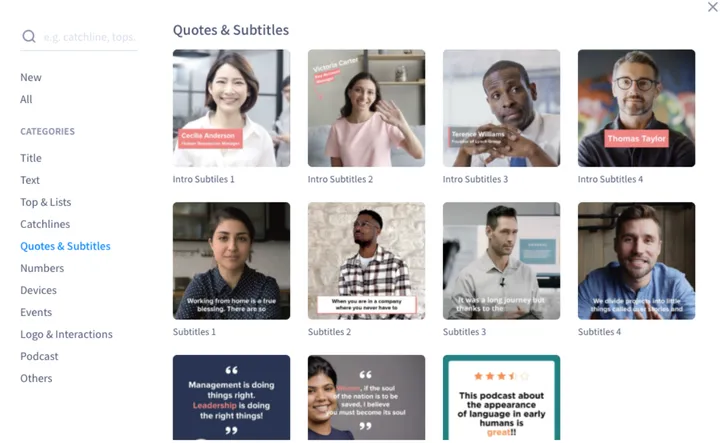
On the PlayPlay video editor, click the “+” button to add a new screen, then select “Quotes & Subtitles” from the pop-up.
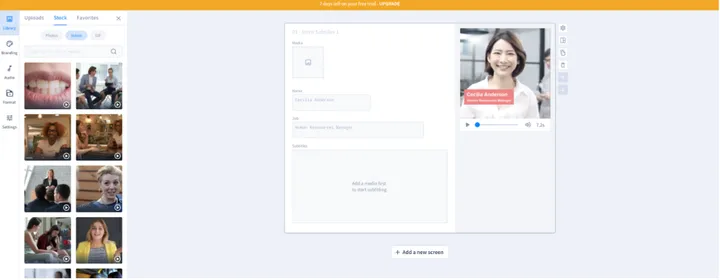
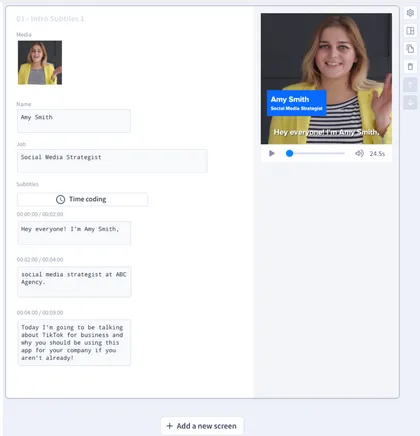
For this example, this is what the “Intro Subtitles 1” template looks like with example content pre-filled on the PlayPlay interface. Before you can add subtitles, you first need to add your video by dragging and dropping in the “Media” field.
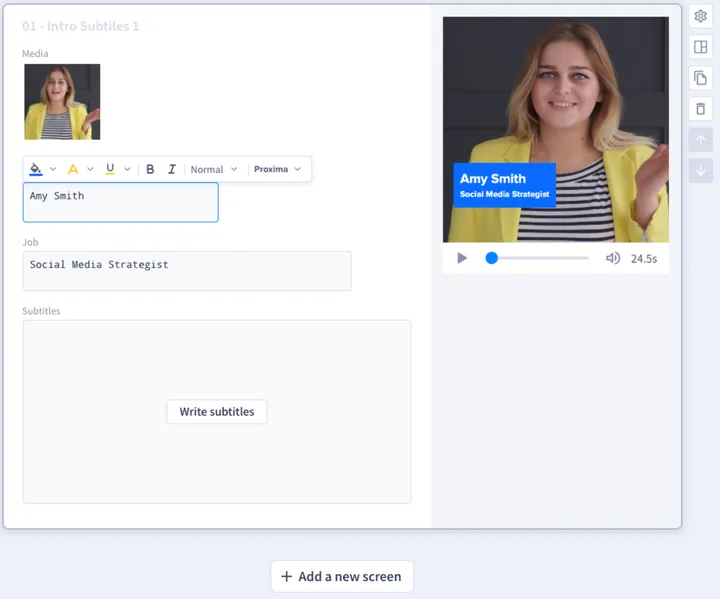
After adding your video interview, you can edit the “Name” and “Job” text fields. You’ll see a hover bar appear with options to edit your text font and size, as well as add text highlights or typographical emphasis like bold, italicize, or underline.
You can watch a live preview of your changes on video playback to the right. Then click on the “Write Subtitles” button.
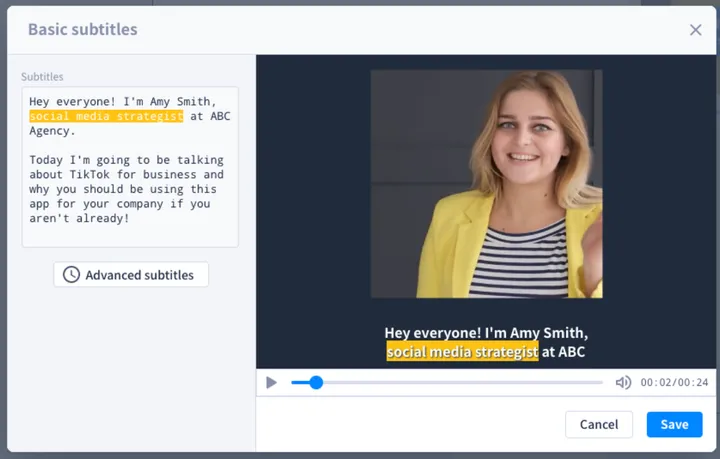
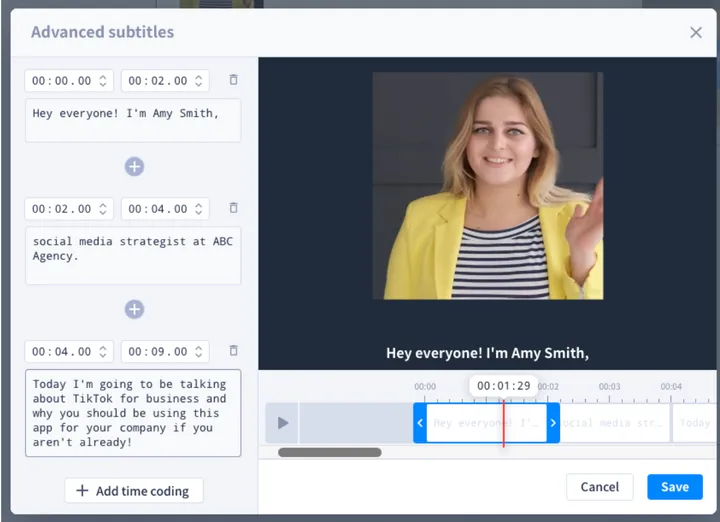
Here you have 2 options: basic subtitles or advanced subtitles.
- Basic subtitles: Either manually type or paste your subtitles into the text box. When you click into the text box, you'll also have the hover bar for full text style editing like in the previous step. You’ll see a live preview of your subtitles in the video player on the right.
- Advanced subtitles: This allows you to get more specific. Manually enter your subtitles with timecodes to determine exactly where they appear in each frame of your video interview. You can add as many time codes as you need and preview live changes in the video player to the right to make sure they’re synced smoothly with the speaker. Click “Save” when you’re done.
You’ll then go back to the main editor interface, where you can add any additional video scenes with “Add a new screen”. For example, a CTA at the conclusion with event information or a website to visit.
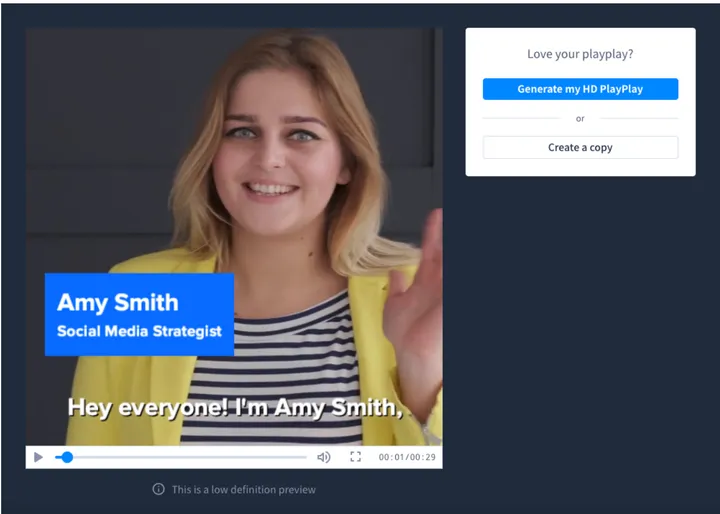
It’s that simple! Hit “Generate my HD PlayPlay” to download your final video in HD quality and get a direct link to your video for easy sharing on social media.

PlayPlay Pro Tip
You need a full list of animated text generators to decide on which tool you would like to rely? No worries, we've got you covered!
YouTube
With more than 2 billion monthly active users and 1 billion hours of video watched daily, YouTube is the second most-visited site in the world. It’s also the preferred video platform for more than 55% of marketers, making $19.77 billion in YouTube ad revenue during 2020 alone.
YouTube offers three different methods for adding subtitles to your videos: auto-transcription, manual typing, or directly uploading an SRT file (short for SubRip Subtitle file). The benefit here is that you have plenty of flexibility and choice when it comes to applying subtitles and captions to your videos on YouTube.
How to add subtitles to your video on YouTube:
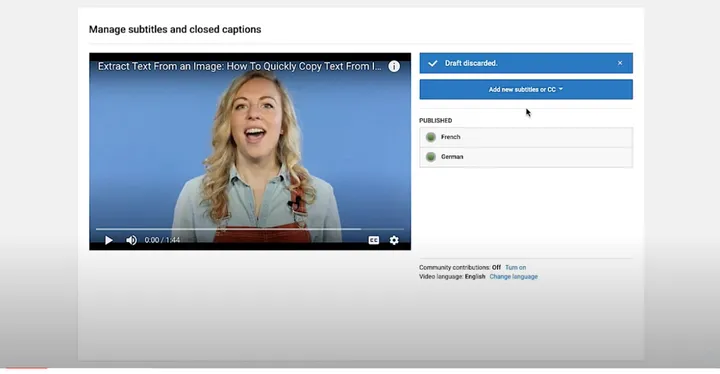
After uploading your video, go to YouTube Studio Editor. From there, click on the button “Add new subtitles or CC” as shown above, then enter and choose your desired language from the drop down menu.
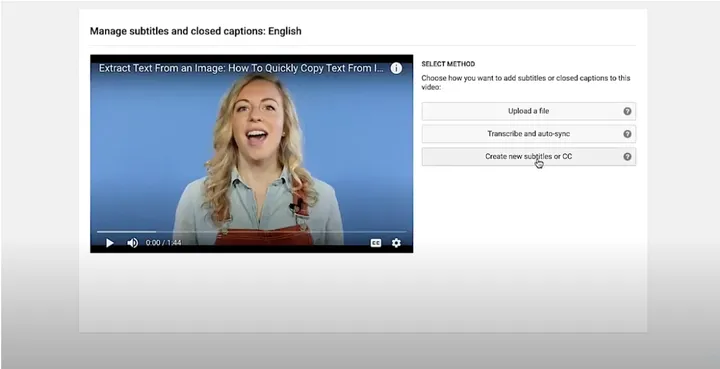
Next there are 3 buttons that each correspond to a different method you can choose to apply your subtitles to your video:
- Upload a file: Choose your SRT file (includes transcript with timecode data) or transcript file (text only) to upload. You can manually review and edit the populated subtitles in the YouTube Studio Editor interface by clicking on the text.
- Transcribe and auto-sync: Manually type out your subtitles or captions alongside video playback, and YouTube will automatically sync them to each frame.
- Create new subtitles and CC: This option activates YouTube’s auto-transcription feature which automatically creates subtitles for your video. YouTube’s algorithm is usually quite spot-on for subtitle automation, but it’s always a good idea to manually verify the results to make any corrections before publishing.
And voilà, those are the three different methods you can use to add subtitles to your videos on YouTube!
Camtasia
Camtasia is a video editing software known especially for its advanced screencast capabilities. It’s an especially useful tool for creating video tutorials, presentations, and showcasing digital products in-action, as you can integrate live screen recording directly into your video content.
This all-in-one editing software also includes special effects, transitions, and other features in a user-friendly interface that’s well-suited for beginners and experienced video creators alike. Not sure what kind of video transitions you should use? Check out the blog post to learn more and see inspiring examples!
How to add subtitles to your video on Camtasia:
Camtasia features three methods for adding subtitles: manually, automatically, or with their built-in speech-to-text feature, Knowmia. Here’s a closer look at each.
Manual transcription method:
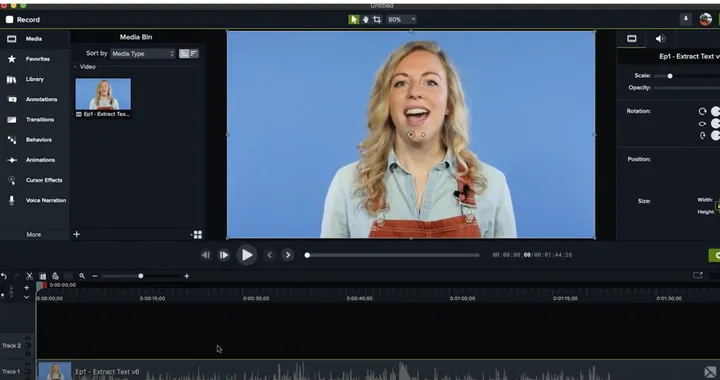
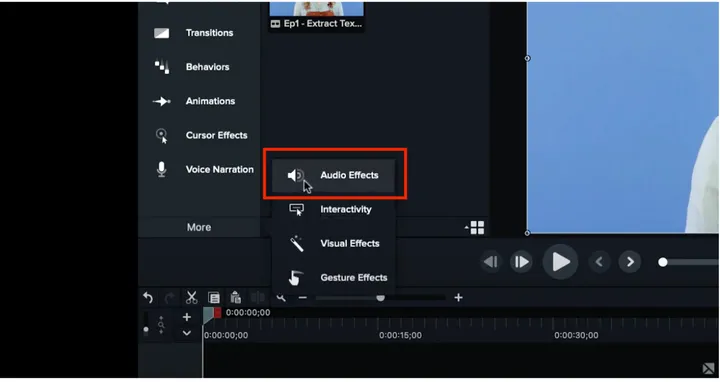
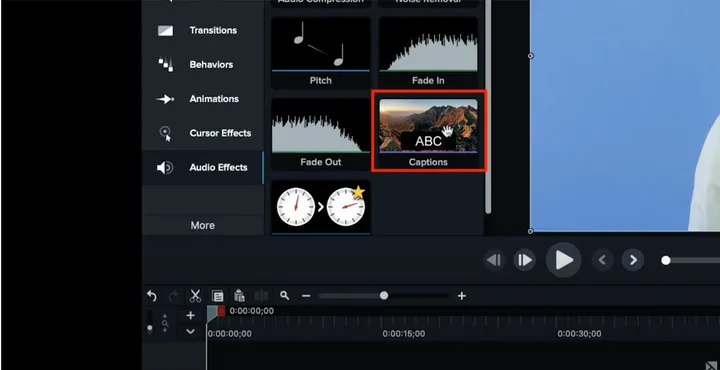
First, in the left hand column of the Camtasia interface, hover over “More” and then click on “Audio Effects” in the menu.
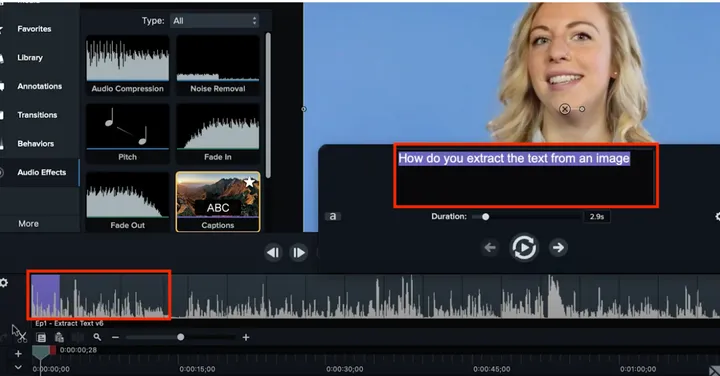
Next, click on the “Captions” image, and then drag and drop it directly onto your audio track below. This creates a separate waveform above your audio track which automatically generates empty caption fields at 4-second increments.
You can then manually transcribe your subtitle or caption text into these fields alongside video playback. You can also adjust each and every one of these increments longer or shorter to edit when your captions appear in each video frame.
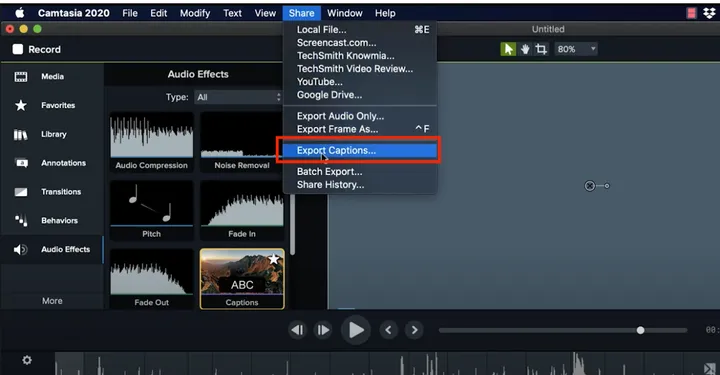
When you’re done transcribing all the subtitles or captions and editing their timecodes, go to “Share” in the top menu and choose “Export Captions” to save your work as a SRT file.
Automatic transcription method:
This feature is currently only available for Windows users.
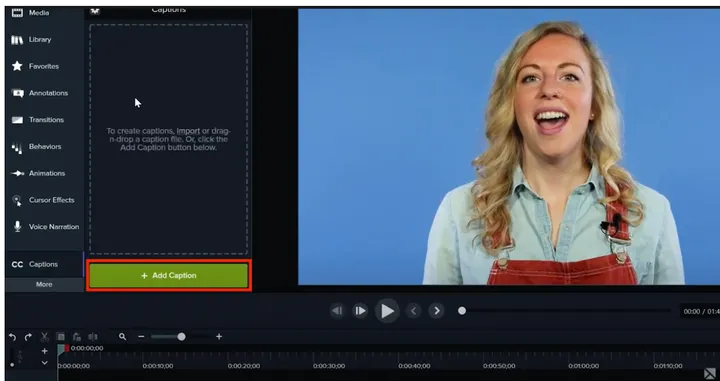
In the video software, click on “More” then “Captions”.
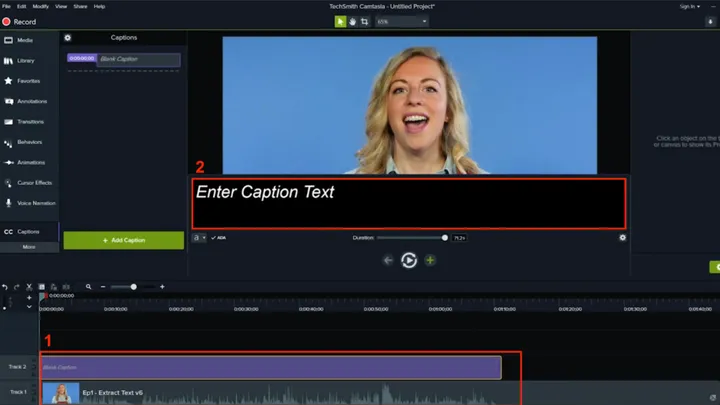
From here, you have the choice to either import your script if it’s already written out, or click on “Add Caption”, which will create a caption field that you should adjust to match your video’s audio length (as shown in the next picture with the purple bar).
Paste your script text into the field marked “Enter Caption Text”.
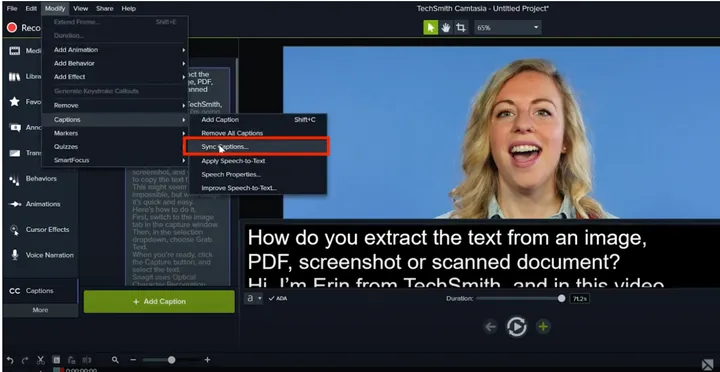
After script text is pasted into the field, it will also populate in the text box on the left. Then go to Modify > Captions > Sync captions. The last step is simply clicking words in the left text box as they are spoken in the video playback, which will automatically organize the subtitles frame by frame.
Knowmia speech-to-text method:
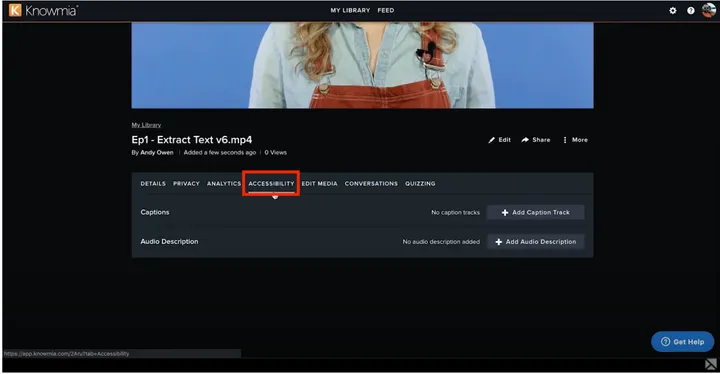
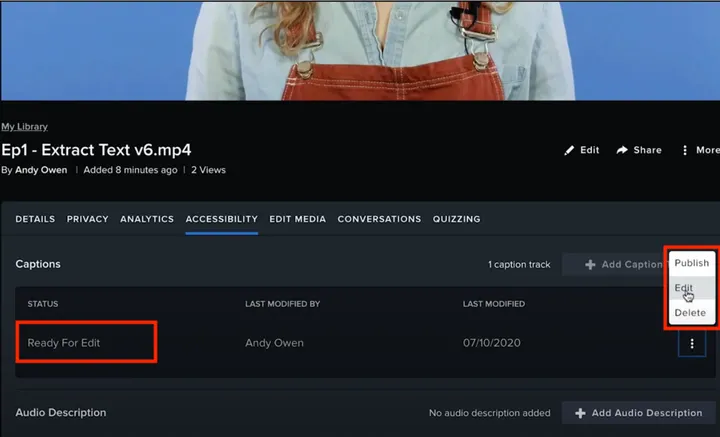
Within the video interface, click on “Accessibility”. Then click on “Add Caption Track”.
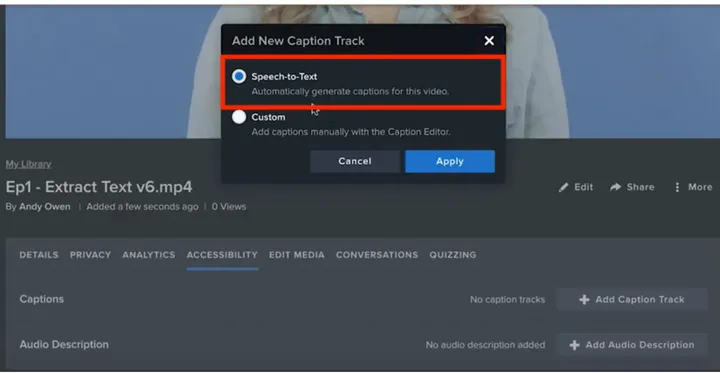
A pop-up will appear with two options, choose “Speech-to-Text” and apply to start automatically transcribing your video’s speech into subtitles.
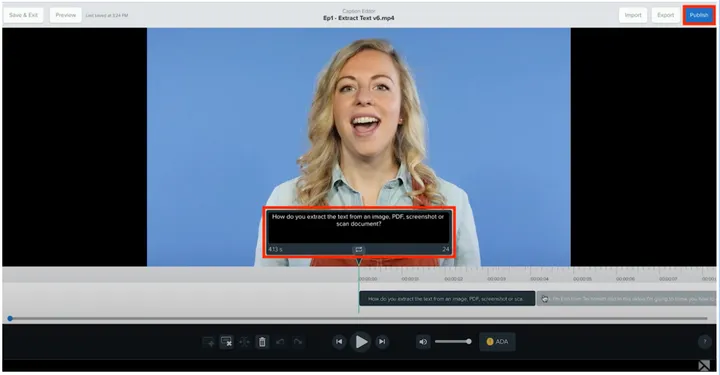
You will see a status line appear on the interface that tells you the software is currently “Transcribing” your video’s subtitles. Once the transcription is complete, you’ll receive an email notification and the status will update to “Ready to Edit”. Click on the 3 dots to the right and click “Edit” to manually review the auto-transcribed subtitles and correct any spelling or grammatical errors. When you’re done, click “Publish” in the top right corner. That’s it!
Boost your video performance with subtitles
As you can see, there are a wide range of tools to help you add subtitles and captions to your video–manually or automatically. By regularly incorporating this step into your video creation process, you can increase public accessibility to your videos and significantly boost the performance of your content. Sign up for your free 7 day trial of PlayPlay today to get started on your next video!
Melissa Francois
Head of Global Content & Comms
With over 10 years of experience in the wild world of SaaS, Melissa cares about building great brand stories and driving community engagement through engaging content. Off the clock, she enjoys long walks and a pint in a cozy country pub.


